Setting up Ubuntu to tftpboot with menu for installations
by firestorm_v1 on Aug.17, 2009, under How-To's, Linux, Networking, Software
This howto will cover performing the necessary steps for configuring Ubuntu Server 9.04 to distribute pxelinux images over the network for you to use to install Ubuntu or your favorite Linux distribution over the network. No more fumbling for installation CDs or boot floppies!
I have done countless Linux installations where a Boot CD or a boot floppy was required to install with. Typically I’d find that media was scratched or otherwise inoperable. Fed up with it, I sought out a solution to make it work to where I didn’t need a CD or a floppy disk. This HOWTO will take you from a Ubuntu server to an Ubuntu Server that now allows for TFTP booting! It’s not as hard as it sounds and I completed my installation in little over an hour. The longest part was to mount the CDROM images and perform the copy.
While not all network adapters support PXE booting, most onboard NICs do. If unsure, there’s nothing wrong with keeping a network bootable NIC in your parts drawer for use later.
Prerequisites:
Required:
- Root access on a computer already set up with Ubuntu Server that has a valid IP address and is connected to the network.
- A computer with a bootable network card (I recommend the Intel Pro 100 series) or an installation of VMware for testing the TFTP boot environment.
- A Hub, Switch or router that can act like a hub or switch.
- Linux installation CDs of the distribution you want to use. (For this installation, I will be using CentOS 5 as the install to make available on the network)
- Access to edit the DHCP configuration of the server handing out IP addresses.
- A copy of the Ultimate Boot CD, or the ISO image to the UBCD. The UBCD can be downloaded from http://www.ultimatebootcd.com/
- A copy of the pxelinux.0 file from http://syslinux.zytor.com/
This document assumes that you have basic knowledge of Linux as far as navigating the filesystem and filesystem structure. Since this is considered “administration level” work, this will require that you work as the “root” user and understand the ramifications of using this level of access. If you have questions about a specific command, either continue reading without performing the step or perform some Google searches to find out what the command does. This document will not require you to compile anything or know any significant amount of code and examples are provided so that you can cut and paste as much as possible.
Overview
This howto is broken up into several sections to make reading a bit easier. Feel free to leave comments on what works and what doesn’t and ask for help if you desire.
- Installation and configuration of tftpd-hpa for Ubuntu
- File placement in the /tftpboot directory
- Configuration of pxelinux.0 and the DHCP server
- Installation of VSFTPd for Ubuntu
- MD5sum, Mounting, Copying and Unmounting the disk images
- Configuring boot menus using the menu.c32 from the UBCD
- Troubleshooting
- Tips and Tricks
Commands that you can use are highlighted in bold with examples being shown in a code box.
WARNING: This signifies a critical message that needs to be read and understood prior to command execution otherwise system damage may result
NOTE: This is an informational note that you might want to consider for better understanding od a command used.
Options in italics are parameters to a command that need to be supplied. If an option is surrounded by curly brackets {like this} it is indicating an additional option that may vary on your system. If an option shows up in bold and italics , then it is meant to be used together as a command referenced.
“Files in quotes” are either representative of screen output or a file that will be worked with. This will be context sensitive.
Installation and Configuration of TFTPD-HPA for Ubuntu
With all that prep talk out of the way, let’s get started. Go ahead and log into the server that you will be performing the install on.
First off, let’s make sure that you’re root, by typing whoami in the login window:
root@littleblackbox:~# whoami
root
If whoami returns something other than “root”, then either su – and become root or ask for assistance.
Now that you’re root, we will tell the server to get the tftpd-hpa package from the Ubuntu repository. We’ll use the command apt-get install tftpd-hpa This will tell apt-get to fetch the application and install it to your machine so you can use it.
root@littleblackbox:~# apt-get install tftpd-hpa
You will see a lot of fetch text scroll back but as long as it shows up that “tftpd-hpa installed successfully” then you are good to go on to the next step. First off, we need to decide where the “tftpboot” directory will live that is used by tftpd-hpa to distribute.
NOTE: Ubuntu by default will create a “/var/lib/tftpboot” directory as part of the tftpd-hpa installation. You can keep this path if you want, however in my installation I chose to go with “/tftpboot” instead. If you wish to use “/var/lib/tftpboot” then be sure to substitute that path in place of “/tftpboot”.
I went ahead and created the “/tftpboot” directory by using the following command:
root@littleblackbox:~# mkdir /tftpboot
Now that we have the directory, we need to edit the “/etc/defaut/tftpd-hpa” file so that the application has the correct information to start:
#Defaults for tftpd-hpa
RUN_DAEMON="no"
OPTIONS="-l -s /var/lib/tftpboot"
Change the “RUN_DAEMON” from no to yes, and change the “OPTIONS” to reflect where you want the tftpboot files to go. My file looks like the one below:
#Defaults for tftpd-hpa
RUN_DAEMON="yes"
OPTIONS="-l -s /tftpboot"
This tells the tftpd-hpa application to always run and that we want to use the “/tftpboot” directory to serve our image. Now we need to start the service:
root@littleblackbox:~# /etc/init.d/tftpd-hpa start
Starting HPA's tftpd: in.tftpd.
If the display shows “in.tftpd.” then you’re successful, Pretty easy so far, but now we get into the harder stuff.
File Placement in the /tftpboot directory
Now that we have our tftp server running, let’s put some files in place.
- Copy the pxelinux.0 to /tftpboot
- Copy the menu.c32, chain.c32 from the UBCD to /tftpboot
- Copy the memtest image from the UBCD to /tftpboot/images
- Copy the defaults.cfg from the UBCD to /tftpboot/menus/
While you’re at it, let’s make two directories as well:
root@littleblackbox:/tftpboot#mkdir menus
root@littleblackbox:/tftpboot#mkdir images
root@littleblackbox:/tftpboot#mkdir pxelinux.cfg
The “menus” directory will be where we will place the menu files, the “images” directory is for the boot disk images that we’ll link to in the menus that we’ll create, and the “pxelinux.cfg” directory will be where we place the configuration file for the PXE loader. The PXE loader is capable of so much more than just what we’re doing here, but that is way outside the scope of this howto.
NOTE: Keeping this directory organized is important. Duplicate filenames and mis-coded directory paths are the most common foul-ups when working with tftp or when working with files in general. Cleanliness may be next to Godliness, but in a linux server, it’s vital to prevent “oops”es.
Configuration of pxelinux.0 and the DHCP server
Some of you that did some prior research may be screaming “What about the DHCP server?” Well that’s coming up, but first we gotta finish building the TFTP configuration so we can test it first.
First off, let’s create a file in “/tftpboot/pxelinux.cfg” called “default”. This is important because as soon as PXElinux bootstraps the machine, it’s going to want to find a configuration file. If no file is specified, the machine will scout about looking for a configuration in the “pxelinux.cfg” directory until it either finds one at which point it will boot the image specified or it will give up and sit there with some error on the screen.
For the “default” configuration file, copy and paste this in.
default main
 prompt 1
 timeout 15
 label main
 kernel menu.c32
 append menus/main.mnu
The first line default tells pxelinux to show the item with the same label as the default selected boot option. If the timeout value is reached (15 seconds), then that boot image is started if it is available.
The second line prompt 1 forces pxelinux to show the “boot:” prompt after it has loaded.
The third line timeout 15 sets the boot delay to give you the option of entering a boot image. It’s not really used in this configuration as we will be “booting” the menu system, but it’s there to keep the configuration standards compliant, which is always a good thing.
The fourth, fifth and sixth lines make up the default boot image that we want to load and is a format you’ll want to remember for later. It will come back to you again.
- LABEL main – This is how the item is presented at boot time (or menu generation time).
- KERNEL menu.c32 – This is the kernel image to boot if the option is selected.
- APPEND menus/main.mnu – This line specifies any additional kernel level options that the kernel needs to operate. Typically there may be a call to an initrd (initial ramdisk) or some other commands. This specific line tells the “menu.c32” menu kernel to load the “menus/main.mnu” menu as a boot parameter to get the menu to render.
Save the file as “default” within the “/tftpboot/pxelinux.cfg” directory. Now that we have the default configuration created, it’s time to create the first menu. Don’t worry too much about the parameters right now as we’ll go over them in the next section. Copy and past this into a text editor and save it as “main.mnu”
MENU INCLUDE /menus/defaults.cfg
LABEL memtest
 MENU LABEL Memtest86 V3.3
 KERNEL /images/memtest
This will be the first menu in your menu system. Since we’ve finished with the tftpboot directory, let’s compare. I use the command tree to print out this list, you can apt-get install tree to compare it or just compare the list with your “/tftpboot” directory contents:
root@littleblackbox:/# tree /tftpboot
/tftpboot
|-- images
| `-- memtest
|-- menu.c32
|-- menus
| |-- defaults.cfg
| `-- main.mnu
|-- pxelinux.0
`-- pxelinux.cfg
     `-- default
Now, there is one critical bad thing that we’ve been missing. It’s also the only thing preventing us from testing the installation at this point. We need to configure the DHCP server!
NOTE: The following instructions are for Linux and are tailored for a situation where the DHCP server is on the same computer as the TFTP server. This is important as the directives we add to your configuration tell the TFTP client where to go to get the image needed to boot the machine. If you have another server that serves IP addresses via DHCP, then you will need to adjust the IP address to point to the IP of the tftp server. If you cannot adjust your DHCP server’s parameters, consider starting a DHCP server on this machine instead of using the unadjustable DHCP server.
When the PXE (or Preboot eXecution Environment) starts a machine, it has just enough software to initialize the NIC and pull for an IP address. When the DHCP server responds to the PXE’s request, along with the IP address, it will provide a TFTP server address and the image name for booting. The PXE then takes this information and attempts to download and execute the image from the TFTP server.
What this means is that you don’t have to have the TFTP server on the same machine as the DHCP server but you DO have to be able to get the TFTP server’s IP and the image name into the DHCP server. Otherwise, the PXE will be attempting to talk to a server that doesn’t exist or doesn’t have a TFTP service running or worse yet doesn’t have the image you’re looking for.
WARNING: Editing the DHCP configuration file is platform dependent. On Ubuntu, the configuration file is named “dhcpd.conf” and is located in “/etc/dhcp3” while Redhat on the other hand still calls their file name “dhcpd.conf” but stores it directly in “/etc”. Your configuration may differ, you will need to find your configuration file and edit manually.
Edit the DHCP configuration file and within your subnet declaration, add two lines:
next-server 192.168.0.2;
filename "/pxelinux.0";
Here is a sample subnet declaration from my dhcpd.conf. Don’t copy and paste the below text into your configuration as the directives may not match yours.
subnet 192.168.0.0 netmask 255.255.255.0 {
 range 192.168.0.20 192.168.0.50;
 default-lease-time 86400;
 max-lease-time 86400;
 option routers 192.168.0.1;
 option broadcast-address 192.168.0.255;
 option subnet-mask 255.255.255.0;
 next-server 192.168.0.2;
 filename "/pxelinux.0";
The next-server directive specifies the IP address of the TFTP server and the filename directive specifies the path to the image to boot.
NOTE: All paths are relative according to “/” (the root) of the TFTP server. So even though the file is “/tftpboot/pxelinux.0” the filename specified here is just “/pxelinux.0” because the “/” of the TFTP server is the directory “/tftpboot”. Confused? Good. :p
Restart your DHCP Server with the command below:
root@littleblackbox:/# /etc/init.d/dhcp3-server restart
* Stopping DHCP server dhcpd3 [ OK ]
* Starting DHCP server dhcpd3 [ OK ]
root@littleblackbox:/#
If your server restarted, let’s test it out! Get your test rig or VMware installation together and try it out. If everything is properly in place, you should boot to a blue screen with “Memtest 86 V3.3” highlighted. Hit the “enter” key and see if it starts Memtest. If it does, then congratulations, you’re up and running. If it doesn’t work, scroll down to “Troubleshooting” and take a look at possible causes.
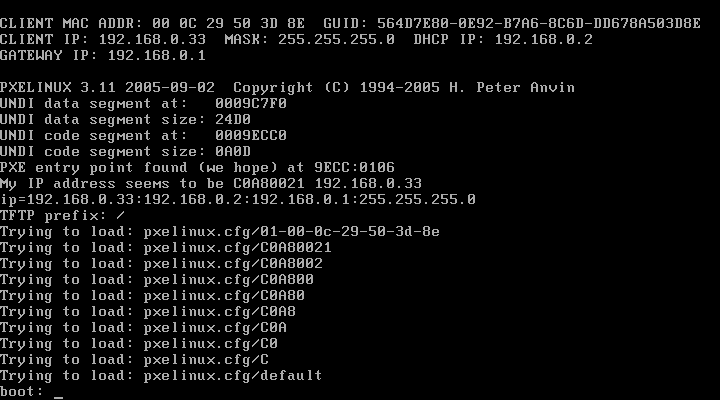
Here is a screenshot of PXElinux booting:
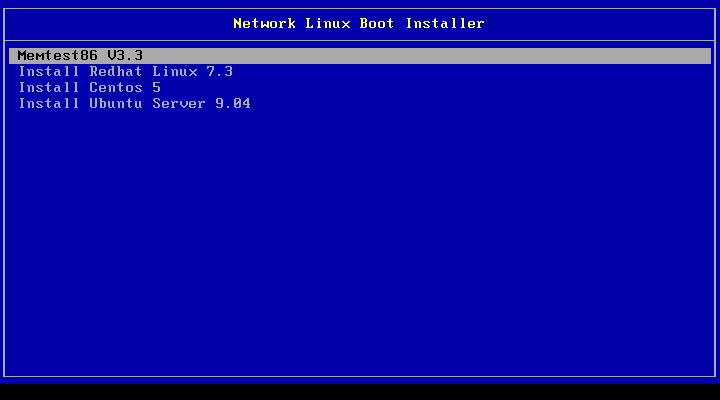
Here is an image of the PXEboot menu. You will only have the first option. I configured my server first then thought this would make a good HOWTO so the other menu entries come up later.
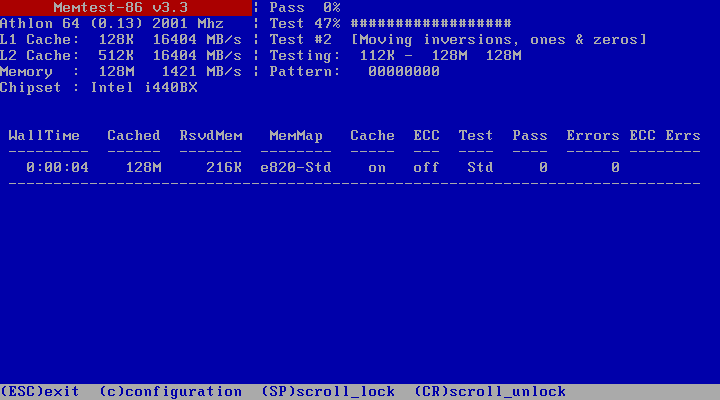
Hit enter and launch Memtest. It should drop you to a screen that looks something like this:
If you’ve gotten this far and your test station launched Memtest with no errors, it’s time to go to the next section and set up VSFTPd so we can actually have stuff to install. As it is, you have a fully capable memory tester on your hands. All you need now is a computer that boots from TFTP and you no longer need to look for those long lost Memtest floppies! Of course, this is merely scratching the surface of what you can do. Let’s go on to the next section where we will start getting a major distribution in place for installation.
Installation of VSFTPd for Ubuntu
Well, we have made it this far and we’re actually closer to completion than you would think. So far we have accomplished the following tasks:
- We’ve set up tftpd-hpa on our Ubuntu server.
- We’ve configured it to stay running in memory and given it a location and files to serve.
- We’ve configured pxelinux so that the client can find all the files necessary to boot the menu system.
- We’ve configured the menu system with a test image to distribute and,
- We have successfully TFTPbooted pxelinux, the menu system and the memtest image and know it all works.
Now we need to install VSFTPd which is an FTP server for Linux. “Why FTP?”, you ask. The reason is simple. FTP is easier to configure than Apache (the Linux Webserver) and is the default network installation method for most linux distributions. While technically you could install using HTTP, you’d have to configure Apache on your server and if you’re using Apache to host files to the public internet, then you’d have to create a virtual host and all that mess. FTP is much easier to set up and easier in this case is a good thing.
So, let’s start off by installing VSFTPd
root@littleblackbox:/# apt-get install vsftpd
You’ll see a lot of text fly by and at the end you will see that the server was started. Unlike most FTP servers, VSFTPd has it’s own home directory in “/home” and not “/var/lib/ftp” or “/var/ftp” (as is common on some RedHat systems. Now that we have the VSFTPd server installed, it’s time for more directory creating. Since I use my FTP server for more than just storing images and installation media, I recommend the below hierachy to keep everything making sense. Remember the note from the file placement section about keeping things clean? Well now it’s going to get implemented to the extreme. Since this is YOUR ftp server, you can do whatever you want, but take these guidelines into advisement:
- Keep your installation files away from other files by placing them in a different directory
- Keep your directory structure simple, but don’t afraid to use subdirectories.
- On the other hand, don’t use too many subdirectories. You don’t want to have to remember a long path like “/dist/var/ftp/server/os/i386/redhat/Centos/5.2/installer” but simply copying everything into the FTP server’s “/” is strongly discouraged.
With my server, I have chosen this directory heirachy:
- /bootdisks – images for boot floppies, should I ever need one, here they are.
- /dist – This tells me that there are complete linux distributions available in this folder.
- /dist/iso – This tells me that the .iso CD images of the distributions available are here.
- /dist/installer – This tells me that the installers I’m looking for are located here.
- /dist/installer/centos5 – This tells me that the installer distribution for CentOS5 is in this directory. This is the directory I give to the installer later.
Note: As stated previously, you don’t HAVE to use this heirachy, you could use /centos5 as your installation directory if you want. If you are net-installing a bunch of distributions however, your FTP server root could get messy.
Ok, enough talk about orginazation, let’s get to making files:
root@littleblackbox:/# cd /home/ftp
root@littleblackbox:/home/ftp# mkdir bootdisks
root@littleblackbox:/home/ftp# mkdir dist
root@littleblackbox:/home/ftp# mkdir dist/iso
root@littleblackbox:/home/ftp# mkdir dist/installer
root@littleblackbox:/home/ftp# mkdir dist/installer/centos5
MD5sum, Mounting, Copying and Unmounting the disk images
If you haven’t already done so, go ahead and copy the CD images into your Ubuntu server. You can use any folder, although a temporary empty folder is recommended. I copied my files into ~/CentOS5. If available, make sure you copy the MD5sum file along with them to your temporary directory on the server.
CD into the directory and we can use MD5 to check these files using the syntax below:
root@littleblackbox:~/Centos5# md5sum -c md5sum.txt
This command ‘md5sum’ generates an MD5 hash which should be identical to what is in md5sum.txt. The MD5 hash is like a special checksum validation that you can use to validate that downloaded files match their sources on the server you downloaded them from. Using the above command, I get the below results indicating a valid match. If one of the files had been changed by even so much as a comma in a configuration file on the ISO, the test would have failed.
root@littleblackbox:~/Centos5# md5sum -c md5sum.txt
CentOS-5.3-i386-bin-1of6.iso: OK
CentOS-5.3-i386-bin-2of6.iso: OK
CentOS-5.3-i386-bin-3of6.iso: OK
CentOS-5.3-i386-bin-4of6.iso: OK
CentOS-5.3-i386-bin-5of6.iso: OK
CentOS-5.3-i386-bin-6of6.iso: OK
root@littleblackbox:~/Centos5#
If you don’t have the md5sum.txt, you can still use the md5sum application. Use the command below to generate the MD5 checksums of the ISO images:
root@littleblackbox:~/Centos5# md5sum *.iso
This command will output the MD5 checksum and the filename for each of the files. You then compare this to what is listed on the server where you got them and compare the numbers. If they do not match, you know you got a corrupted download. Here is the MD5sums of the ISO images I have:
dd93a6da1b900548825159206099603c  CentOS-5.3-i386-bin-1of6.iso
 5441ae0a3c9efd47cd8bfab873fe20c1  CentOS-5.3-i386-bin-2of6.iso
 024ca72da4e14f79522a90bf8f4fdf9f  CentOS-5.3-i386-bin-3of6.iso
 95e5e446754e76b3fa07aaf4946c0aa9  CentOS-5.3-i386-bin-4of6.iso
 0cda242797ded4b6b2ea0469984aca82  CentOS-5.3-i386-bin-5of6.iso
 889ff6389108a85780a06cd38b7375e7  CentOS-5.3-i386-bin-6of6.iso
We have our FTP server and we have our validated ISO images. Now it’s time to get messy. The next part comes in mounting these CD iso images, then copying their contents to the FTP directory we made earlier. This can be tedious and can be done incorrectly, rendering a good amount of time wasted if you aren’t careful.
NOTE: The instructions here are specific for CentOS 5.3 but are commonly applied to most CD based distribution installers. When in doubt, check with your distribution’s web site about what you need to do to perform a network installation. Some distribution vendors may require a different file path be created.
We’ll start off by creating a temporary directory within the temporary directory called “source” and another one called “destination” and then mount the first ISO image into the source directory by use of the loopback option. Once mounted, we’re going to copy everything from source and put it in destination, then unmount the ISO image and repeat for the other 5 images. You can see the commands I used below.
root@littleblackbox:~/Centos5# mkdir source
root@littleblackbox:~/Centos5# mkdir destination
root@littleblackbox:~/Centos5# mount -o loop CentOS-5.3-i386-bin-1of6.iso /source
root@littleblackbox:~/Centos5# cp -R ./source/* ./destination
root@littleblackbox:~/Centos5# umount ./source
root@littleblackbox:~/Centos5# mount -o loop CentOS-5.3-i386-bin-2of6.iso ./source
root@littleblackbox:~/Centos5# cp -R ./source/* ./destination
root@littleblackbox:~/Centos5# umount ./source
root@littleblackbox:~/Centos5# mount -o loop CentOS-5.3-i386-bin-3of6.iso ./source
root@littleblackbox:~/Centos5# cp -R ./source/* ./destination
root@littleblackbox:~/Centos5# umount ./source
root@littleblackbox:~/Centos5# mount -o loop CentOS-5.3-i386-bin-3of6.iso ./source
root@littleblackbox:~/Centos5# cp -R ./source/* ./destination
root@littleblackbox:~/Centos5# umount ./source
root@littleblackbox:~/Centos5# mount -o loop CentOS-5.3-i386-bin-4of6.iso ./source
root@littleblackbox:~/Centos5# cp -R ./source/* ./destination
root@littleblackbox:~/Centos5# umount ./source
root@littleblackbox:~/Centos5# mount -o loop CentOS-5.3-i386-bin-5of6.iso ./source
root@littleblackbox:~/Centos5# cp -R ./source/* ./destination
root@littleblackbox:~/Centos5# umount ./source
root@littleblackbox:~/Centos5# mount -o loop CentOS-5.3-i386-bin-6of6.iso ./source
root@littleblackbox:~/Centos5# cp -R ./source/* ./destination
root@littleblackbox:~/Centos5# umount ./source
What we’ve done now, is created a directory called “destination” and copied every CD to that directory, overlapping them. What this does is it puts all the CentOS install packages into one directory and adds the necessary additional files to the root of the directory where the installer can find them. Now that we’ve done this, we can move the ISO files to the FTP server’s ISO directory and the “destination” files to the centos5 directory. I also moved the md5sum.txt and renamed it to CentOS5-i386-MD5SUM.txt so that way I know that the md5sum.txt is related to those ISO images.
root@littleblackbox:~/Centos5# mv *.iso /home/ftp/dist/iso
root@littleblackbox:~/Centos5# mv md5sum.txt /home/ftp/dist/iso
root@littleblackbox:~/Centos5# mv /home/ftp/dist/iso/md5sum.txt /home/ftp/dist/iso/CentOS-5.3-i386-MD5.txt
root@littleblackbox:~/Centos5# mv destination/* /home/ftp/dist/installer/centos5/
root@littleblackbox:~/Centos5# cd /home/ftp
root@littleblackbox:/home/ftp# chgrp -R nogroup *
The last step is key. This makes sure that all the files in /home/ftp have the same group as the FTP user that VSFTPd runs with. Ok, so that’s the hard part. Now we have our installation files in place, our ISOs are in place (in case we need them again) and we’re ready to get those bootdisk images. Let’s take a look and see what we’re up against:
Every distribution has a directory of boot disks that they make available in case you’re doing an installation on a machine that doesn’t support CD booting. All they do is start the system up with enough resources to start the machine and get it to the point where it can run the installation off of a CD. Most installations also provide a network booting image that we can place in our TFTP server to netboot the entire installation.
Thankfully, Centos5 has that available. There is a directory called “images” and within that there is a directory called “pxeboot”. cd into the directory and let’s take a look.
root@littleblackbox:/home/ftp# cd dist/installer/centos5/images/pxeboot
root@littleblackbox:/home/ftp/dist/installer/centos5/images/pxeboot# ls
initrd.img  README  TRANS.TBL  vmlinuz
root@littleblackbox:/home/ftp/dist/installer/centos5/images/pxeboot#
Of course, it helps to read the README file. This may contain important information on what we need to get this image to work properly.
root@littleblackbox:/home/ftp/dist/installer/centos5/images/pxeboot# cat README
The files in this directory are useful for booting a machine via PXE.

The following files are available:
vmlinuz - the kernel used for the installer
initrd.img - an initrd with support for all install methods and
 drivers supported for installation of CentOS
It doesn’t get any simpler than that. The “vmlinuz” file is the kernel and “initrd.img” is the initial ramdisk for the install kernel. Pretty simple. The README did not make any mention of any boot options or parameters so for now we’ll just keep these two files in mind. Other distributions may require some additional options be passed to the installer.
Copy the initrd.img and vmlinuz files to “/tftpboot/images” and we’ll cd into that directory for a little bit more work. Remember when I told you about keeping your “/tftpboot” directory clean? Well, we’re vising that once again. (Getting tired of it yet?) The name “vmlinuz” and “initrd.img” may make sense for one version of Linux to install, however those are very common names. Let’s say you get a copy of CentOS4 and you want to do network boot/install on that too? There’s a pretty darn good chance that CentOS4 uses the same filenames! Since the initrd.img and vmlinuz are compiled for each other, you can’t go about using CentOS5’s initrd on CentOS4’s vmlinuz, they just won’t work.
So let’s start off by renaming the two files to something more descriptive.
root@littleblackbox:/tftpboot/images# mv vmlinuz vmlinuz-Centos5-netboot
root@littleblackbox:/tftpboot/images# mv initrd.img initrd-Centos5-netboot
Now that we have new names for the files, it’s time for the section that I’m sure you’ve been dying to read.
Configuring boot menus using the menu.c32 from the UBCD
And to much fanfare, I’d expect. 🙂 So, let’s review again:
- We’ve set up tftpd-hpa on our Ubuntu server.
- We’ve configured it to stay running in memory and given it a location and files to serve.
- We’ve configured pxelinux so that the client can find all the files necessary to boot the menu system.
- We’ve configured the menu system with a test image to distribute and,
- We’ve successfully TFTPbooted pxelinux, the menu system and the memtest image and know it all works.
- We’ve got our installation media in place on the FTP server with the proper file structure
- We’ve got our boot images in place in “/tftpboot/images” and given them descriptive filenames
Now we need to build a menu to select a menu and start the installer. This is almost the last step, I promise. Remember the main.mnu file from earlier? (Look down, I saved you the scrolling. )
MENU INCLUDE /menus/defaults.cfg
LABEL memtest
 MENU LABEL Memtest86 V3.3
 KERNEL /images/memtest
Well here is where we’re going to go over the options and add another image. Firstly, we are going to review what we have here:
- MENU INCLUDE /menus/defaults.cfg – This line should appear first at the top of every menu file. This tells the menu.c32 how to render your menu (colors, etc)
- LABEL memtest – This tells the menu system that we are creating a new entry definition and that it’s name is “memtest”. All label declarations must be unique.
- MENU LABEL Memtest86 V3.3 – This tells the menu system that the menu should display “Memtest86 V3.3” in it’s text as the selectable item
- KERNEL /images/memtest – This tells the menu system that if this menu item is selected to boot the “/images/memtest” image and execute it.
At this point, we could go ahead and declare a new entry definition and copy and paste however this will cause the machine to fail once the image is selected. Remember, the image we want to make available is comprised of the kernel (vmlinuz) and the initial ramdisk (initrd.img). The menu system will take an additional parameter called APPEND with additional options that are needed to get the kernel to work like installer parameters and initrd statements.
NOTE: Does this look familiar to you? If you are thinking that it looks similar to the LILO boot menu then you are absoloutely correct. There are some differences but mostly the same configuration for LILO can be used here.
All we need to do is to add APPEND to the menu for our new item and we can save it and test. Add the following text into your main.mnu and let’s test it out
label Centos5
 menu label Install Centos 5
 kernel /images/vmlinuz-Centos5-netboot
 append initrd=/images/initrd-Centos5-netboot
That’s all there is to it. We have our label, our menu label, our kernel statement and our append statement with the initrd in there. Try booting your test PC now.
If you select the “Install CentOS 5” option and after a few moments of watching text scroll around, you see the following screen, then congratulations! You have finished making your Ubuntu server network boot a Linux installer.
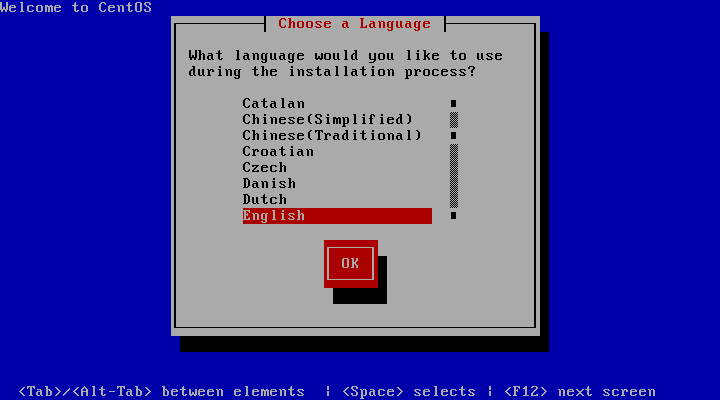
Go ahead and navigate the menus and when you come to the menu asking for FTP credentials, put the following information in:
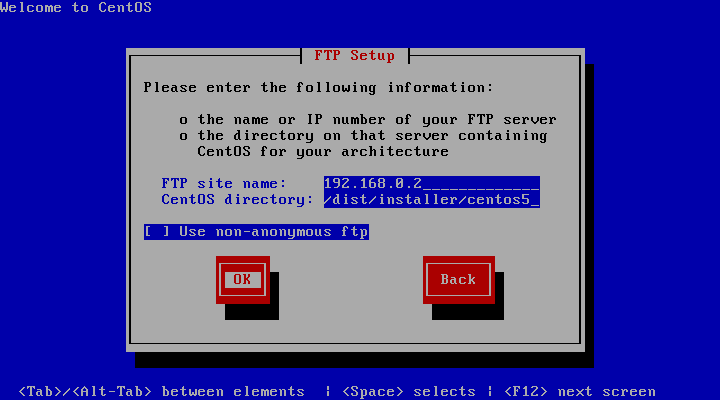
When you hit OK to this screen, the installer will be attempting to fetch the information from the FTP server. Remember, until now we have been in the Preboot Execution Environment and are running in the initrd that was loaded when we selected to install CentOS5. We have not even attempted FTP connectivity at this point. A few nailbiting secconds later, and you should see this screen:
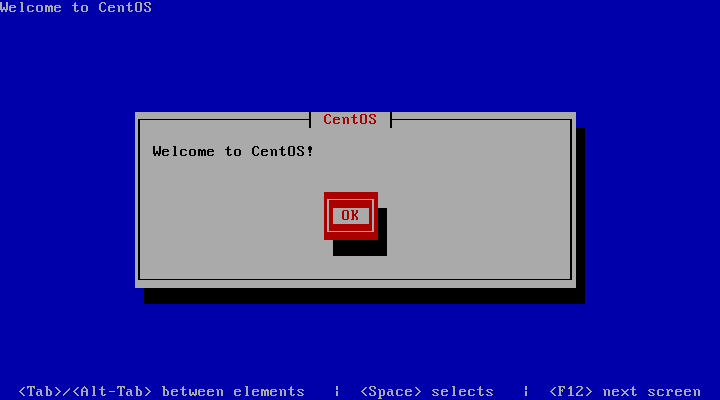
Go ahead and finish the installation if you’d like, or turn off the testing machine.
You’re all done. I do hope that you enjoyed this HOWTO. If you have any comments or suggestions, please leave them in the comments section of this article. If you experienced any issues, please keep reading.
Troubleshooting
So you got through the HOWTO but something didn’t go quite right, Hopefully we can get you running again.
My onboard NIC won’t boot. My computer shows TFTP followed by a bunch of periods and eventually says “TFTP OPEN TIMEOUT” .
If you look at the top of the screen, I’m guessing you’ll see something that says “INTEL LANDesk (R) Service Agent, version 0.99b”. If so, you will have to use a different NIC. There was a firmware bug in .99B that resulted in a lot of PXEboot clients not being able to properly connect to a TFTP server. Unfortunately the only fix was to update the NIC’s firmware which is a dicey thing to do anyways, especially with an onboard NIC. I would recommend just going out and getting a different card.
When booting my CentOS image, it says “KERNEL PANIC: No Init Found”
This means that the booted kernel vmlinuz-Centos5-netboot couldn’t find the initrd to go with it. I would start by looking at your menu file (main.mnu) and see if the APPEND initrd=/images/initrd-Centos5-netboot image name is specified correctly. Try your boot again after editing the file and you should be good to go.
My PXE client says “File Not Found”
Check “/etc/default/tftpd-hpa” and make sure that the path specified on the OPTIONS line is pointed to “/tftpboot” and make sure that the directory has the pxelinux.0 file in it.
My PXE client pulls an IP address but times out when trying to download pxelinux.0.
This means that either the wrong address was specified on the next-server line or that the TFTP server is not responding. Check it by performing this command: /etc/init.d/tftpd-hpa restart and verify it’s running with ps auwxf | grep tftpd
My menu for CentOS 5 shows “CentOS5” instead of “Install CentOS 5”.
Check your menu file and make sure that you have a MENU ITEM specified for this image. If no MENU ITEM is present, the menu system will fall back on to the name assigned on the LABEL line instead.
How can I tell if my NIC will network boot?
Without sticking it in to a machine and finding out if it works, there’s no guarantee that the NIC you have will boot. There are clues that may help you though. Look at the card and see if there is a chip on there that has the word “ATMEL” on it. If there’s no ATMEL chip, but there’s a large socket where a chip should go, then unfortunately that card will not network boot. If you plug it in to your computer doesn’t show any text or banner about UNDI, PXE or Etherboot, then you also may be out of luck. If you have an onboard NIC, take a look in your BIOS and see if there is an option to enable network booting and try again.
Will this PXE booting work over USB? What about Wireless?
- USB – Unfortunately there is not a PXE boot installation available for USB devices. They get initialized by the OS far after the PXE hooks in to execute
- Wireless – The same applies for USB, except if you are doing an installation to a WIRED machine and you use a wireless bridge, you might be able to. The wireless bridge is transparent to the network and PXE so it should function as if you were directly connected to a switch.
Tips and Tricks
Ok, so you got the basics down, let’s examine some of the more advanced aspects of the menu system.
Menu timeout to load a default image – Good for the memtest image. Add “timeout 30” and “default memtest” to the main.mnu. This will tell the menu system to boot the memtest image if no key is pressed in 30 seconds.
Add a sub-menu – Want to add a submenu to the menu system? This one’s easy. Create a new LABEL in your main.mnu and add the following
LABEL submenu1
 MENU LABEL Sub Menu 1
 KERNEL menu.c32
 APPEND /menus/submenu1.mnu
Change the LABEL, MENU LABEL to reflect the new entry and change the APPEND line to point to your new submenu. Copy your main.mnu to your submenu1.mnu file. Edit it and add the necessary entries to that file. If you want to have a “Go Back…” option, make your first entry’s APPEND line load “/menus/main.mnu”
Change your menu’s title.
One thing overlooked here was that my defaults.cfg was already edited for my server. If you copied the one from the UBCD directly, then yours still will say “Ultimate Boot CD” at the top which is kind of funny because the machine you’re installing might not even have a CDROM to boot from. Edit the defaults.cfg in the “/tftpboot/menus” directory and change the MENU TITLE directive to whatever you want. Remember that you can not exceed 76 columns (80 columns – 4 for the borders) otherwise your menu may not display properly.
Afterword
If you would like more information on how to customize your boot menu, check out http://syslinux.zytor.com/wiki/index.php/Comboot/menu.c32 They go through the entire exhaustive option set with code examples and explanations of each option. I have only posted information here that I have used and know works.
I have enjoyed writing this HOWTO and hope that someone out there finds it useful. If you would like to make any comments about this HOWTO or want to share your netboot experience, please by all means leave me a comment.
Thank you for reading, Happy netbooting!
FIRESTORM_v1