Hardware Porn: Seagate Dockstar teardown
by firestorm_v1 on Jul.14, 2010, under Embedded devices, Hardware Pr0n, Linux
 I was given a very interesting product by a friend of mine that happened to catch a good deal on woot.com a few days ago. Apparently Seagate has made a network fileserver device for their Freeagent Go line of portable USB drives called the Freeagent DockStar. (I can only think that this is a play on Battlestar Galactica’s Baystar – a cylon “aircraft-carrier” of sorts.) When I went to look for pictures online of the hardware, I was dismayed to find nothing about the inside of the little thing. So here they are in all their exposed glory, the innards of the Seagate Dockstar.
This is the box that the Dockstar came in. Having not bought a non-OEM seagate drive in ages, I was pleasantly surprised that they used normal cardboard instead of some plastic case for this device. Seagate is really pushing their “Go Green” incentive by changing the entire box (even the box inside) with easy to recycle cardboard instead of that translucent plastic “tray” that normally accompanies electronics. While not necessarily an indication of product performance, it does show that they care about the environment.
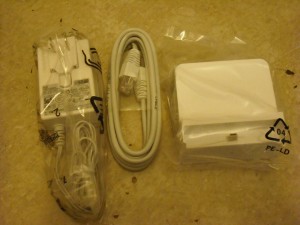
Inside the box, aside from the little “Getting Started Manual” is the following items: A Universal power brick pre-fitted with the US style prongs, a shielded ethernet cable and of course, the dockstar itself.
Here’s a closeup of the universal plug and all it’s various warnings and certifications. I have seen a shift towards these universal plugs and away from the more proprietary plugs that manufacturers would normally use as a cost saving process. Since there is no one world-wide standard on power for every country that Seagate does business with, why spend that money building 20+ different power adapters when all you need is one with different prongs to fit whatever country’s plugs you’re going to be selling to.
And, just because I’m a sucker for details (and I keep losing the power bricks), here’s the voltage and amperage rating of the power brick. Output is 12vDC 2Amps with a positive tip.
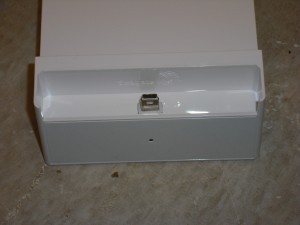
Finally, we get to the dockstar to find what secrets it holds. The front panel has one LED for device status and the USB mini-B port for the Freeagent drive to sit in. Unlike most older-style USB devices, the Seagate Freeagent is powered entirely through the USB port, eliminating the need for two cables to power one device. Overall it’s a simple presentation of what looks to be a fairly complex device.
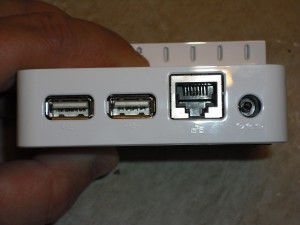
The back of the dockstar has two USB ports, the Gigabit Ethernet port and the power port on it. I would like for there to have been a link and an activity LED for the Ethernet port, but unfortunately this was not implemented. I guess I’m a sucker for LEDs.
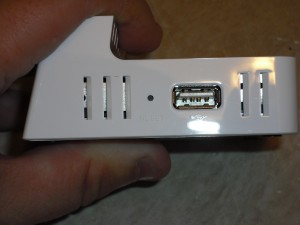
The right side of the dockstar features another USB port and the reset switch for the device. The left side of the dockstar (not pictured) only has cooling vents on the side.
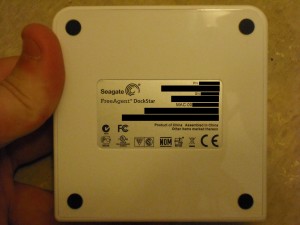
This is the bottom of the dockstar which has a large sticker that shows the serial numbers and MAC address of the device. Of note, there was one number on this sticker which is formatted like some kind of product activation key and is formatted as follows: six alphanumeric characters, hyphen, six alphanumeric characters, hyphen, two alphanumeric characters, hyphen, six alphanumeric characters, hyphen, six alphanumeric characters. At first glance, I thought these were hexadecimal numbers however the letters used were not between A-F and so it’s currently unclear what this number is for. There is no mention of what this number is for in the documentation.
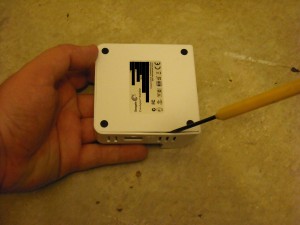
Typically on a device like this and most small consumer devices, there are four screws on the bottom (usually under the black slip-resistant dots) however the Dockstar doesn’t have any. In order to gain access, I used a metal spudger to work the bottom away from the top half of the body. There are two notches on each side of the square base, so you may need to use something flat like a spudger, small flathead screwdriver or a expansion slot blank to pry it open.
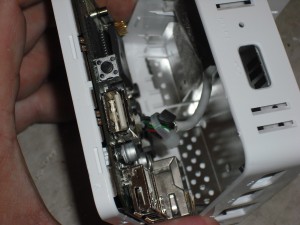
Once you cracked the case open (hopefully without breaking it), you should see the small cable that connects the top USB port to the dockstar’s mainboard. Carefully disconnect this cable and the two halves should now be seperated.
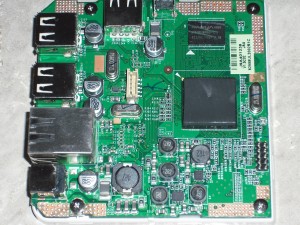
This is the dockstar in all it’s nude glory. The front of the device is to the right in this photograph. The small black square is Nanya 1Gb (comes out to ~128 megabytes) DDR-2 RAM in a BGA package. Datasheet available here and the large square is the device’s main processor. From research I have performed, this appears to be a Marvell 1.2GHZ processor (just like the sheevaplug devices that Marvell is also selling. I tried to pull some more datasheets from plugcomputer.org, but their datasheet listing is quite lacking. For now, just know that it’s an arm compliant processor and when I post an update article, I will have more juicy details on the capabilities of the processor. Also of note, just below and to the right of the processor is a small ten pin header. Presumably this can be used for a serial port however I do not have the cable for that. Once I get it in and test it, I will update this article with a pinout diagram for you. Since this device is so low-level I would not recommend trying to connect a regular serial port to it directly as it more than likely requires a level shifter like a MAX232 to bring the -12/+12VDC down into something that won’t blast the components.
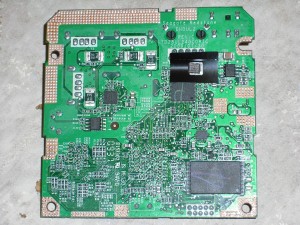
This is the bottom of the dockstar’s mainboard. Unfortunately, the board is now oriented that the front of the dockstar is now at the bottom of the picture. (Bad cameraman, no cookie.) There’s not really much to note here as the board layout is jam packed with passive components. The large black square on the lower right is the NAND storage for the device and while I couldn’t pull up the datasheet for it, the guys over at PlugPBX already had a forum post that showed the Dockstar’s hardware specs for us. According to their chart, the dockstar’s storage is 256MB. which should be more than adequate for general Linux fun. The small chip just under the black tape in the upper right hand corner of the board is presumably the ethernet NIC however googling the chip numbers came up with nothing.
Just looking at the hardware overall, it would appear that the Seagate Dockstar is a very capable device that just needs to be altered to run whatever we choose to run with it. While the software on the device (stock) comes with a filesharing service called Pogoplug, I do not intend on using that software and will be looking to get this device as far away from stock as possible. Here is a list of some things I’ve been thinking of doing with it so far:
- Home NAS (without Internet file sharing)
- multihomed router (I have a stack of pegasus USB modules)
- semiportable network notification device (USB to parallel port, HD44780 LCD display)
- realtime data acquisition device (USB logger and serial ports?)
- Apple MT-DAAPd server for streaming music to iTunes installations on your local network
Some sites I’ve seen while doing research have mentioned things from a in-home webserver with databases, to even a PBX server (take a look at www.plugpbx.org)
The big question is: What would you do with it? Feel free to leave a comment as to what you’d do with this device, suggestions, information, etc.
FIRESTORM_v1
BIG FAT OBNOXIOUS WARNING!:
Because of the Dockstar’s affinity to want to “phone home” thanks to the Pogoplug software, I would not recommend plugging this into your live network just yet. In all of the research I have done for this device, just about every site I have seen has posted some kind of warning about this. The dockstar was originally designed to run with pogoplug which is an internet filesharing service that allows you to access your files from anywhere with Internet connectivity. I don’t exactly trust an outside third party to have access to my files on a device that is only going to be used on a local network so I have not connected mine up to even test it. If you are going to do any work with this device, I recommend that you use a dedicated mini-hub or switch and that it not be allowed to connect to the Internet until you have a complete understanding of what all it wants to do.
10 Comments for this entry
3 Trackbacks / Pingbacks for this entry
-
Seagate Dockstar en déstockage, un Plug Computer très abordable. « Galipe
July 27th, 2010 on 7:53 am[…] Pour voir la bête de l’intérieur, voici des photos de l’ouverture de ses entrailles. […]
-
A picture of the server hosting this site | Steve and Claire's picture galleries
April 14th, 2012 on 4:27 pm[…] per hour, but is bad for your browsing experience (mind you, my upload speed is only 1Mbit)). see this link for some details This entry was posted in Picture by Stephen. Bookmark the […]



July 22nd, 2010 on 11:35 am
Great job on getting the serial port to work. Any idea what the rest of the pins on the 10 pin header do?
July 23rd, 2010 on 8:32 pm
Based on your pictures, I think I’d use it as a NAS as well as a dock for my G1. Looks like a perfect fit.
August 20th, 2010 on 3:10 pm
hackaday.com points to a write up to add a serial port.
September 2nd, 2010 on 12:43 pm
@Peter:
After recent research, it appears that the rest of the pins on the connector are indeed a JTAG port. Since I’ve currently bricked my dockstar, I’m excited to validate and confirm this. Once I have my JTAG programmer, rest assured I’ll be posting an article here.
@cde:
I was thinking of something similar for the functionality of the device, but the idea of using the dock as a dock for the G1 is an excellent idea. I’ve been wanting to get ahold of a dead Freeagent drive but they’re too new to find cases for just yet.
@GZ:
Do you mean this article?
http://hackaday.com/2010/07/22/adding-a-serial-port-to-a-dockstar/
Hack-A-Day was nice enough to publish my article on their site.
September 27th, 2010 on 11:21 pm
@firestorm
there are plenty of USB enclosures on eBay that will fit easily, if a bit off center.
The top slot on the Dockstar is about 5-7mm wider than the smallest USB laptop drive enclosure I’ve seen on ebay. I’ve used/sold over a dozen with no problems. I sell them to clients when they need the files off the drive from their dead laptop, or if they just want to use the drive as an external for backups.
One I’m using now has the mini usb connector near the center, and it fits just fine. They are made of aluminum and anodized, they come in silver, ‘champagne'(pink), blue and black
I posted an image of one from ebay at:
http://bayimg.com/fAplAAAcg
They are about $5 to $7 USD, shipped. I have found that the ones with the usb connector much closer to one side get quite hot, but the ones that are a bit rounded on one end like the picture are cool and fast.
I’m pushing about 1GB/min to one on my dockstar, running Debian squeeze+samba+swat, right now (test backup).
October 16th, 2010 on 12:38 am
great article!
I would like to user this with USB to parallel port driving relays. Has any body seen linux software (driver, scripts) for that?
October 25th, 2010 on 10:48 pm
That’s not a bad idea. I was thinking about using a serial port based setup however I found out that Linux does not support half-duplex serial communication. With a parallel port, you might be onto a good idea. A few shift registers and some control hardware, you could control a lot of relays with one 8 bit parallel bus.
Happy Hacking!
FIRESTORM_v1
October 25th, 2010 on 11:00 pm
Excellent! Thank you for the link. As soon as I get some money, I gotta get a few of them and get my DSes running again!
FIRESTORM_v1
October 24th, 2011 on 2:57 pm
Do you know if we can use a wireless network adapter on one of the USB ports to connect the docstar wirelessly to the network?
Thanks.
November 1st, 2011 on 6:41 pm
Hello Sumit:
Honestly, I’m not sure. I don’t see why not. With a custom OS like OpenWRT or DD-WRT, and wpa-supplicant, you should be able to install and configure the wireless card to work properly. Write back if you are able to get it running. I’m sure that once configured, you could do more with the device than you could with the dockstar tethered.
Thank you for your comment.
FIRESTORM_v1