Networking: Bringing IPv6 into your network using pfSense
by firestorm_v1 on Dec.01, 2011, under How-To's, Networking, Software
 The Internet as we know it is undergoing a significant change. With the last IPv4 addresses being allocated out, the Internet has officially run out of address space. IPv6 is the next-generation IP addressing system that aims to resolve this issue however the changes proposed are drastically different than the current IP schema currently in place and for most is quite a daunting task to switch. In this post, we will cover some basic IPv6 information and some fundamental differences between v4 and v6 (aside from tons of IPs), and finally we will build out a pfSense firewall with IPv6 using pfSense and a free IPv6 tunnel provided by Hurricane Electric. Read more to get started on the cutting-edge of Internet infrastructure.
IPv6 Introduction
First, the basics….
Understanding IPv6 networking may first come off as an extremely complicated endeavor however it’s not that much different from IPv4. The biggest thing about IPv6 is the massive amount of IPs that are made available by the change in the network protocol. To put it in perspective, the entirety of the existing IPv4 address space consists of approximately 4,228,250,625 addresses (from 0.0.0.0 to 255.255.255.255, or 255^4 including private network blocks and multicast addresses) An IPv6 network block (like the /64 network block that we’ll get from Hurricane Electric) contains 18,446,744,073,709,551,616 IPs. The /64 network assigned to us from Hurricane Electric is only a minuscule fraction of the entire IPv6 address space.
An IP address in IPv4 uses four numbers in a dotted quad notation with numbers between 0 and 255, like 192.168.1.4 and will include a subnet mask like 255.255.255.0. This is used to establish the “network” that an IP address is a member of. An IPv6 address is radically different, with 8 hexidecimal (from 0000 to FFF) numbers seperated by a colon (:), then following up with a subnet mask in CIDR notation. An example of an IPv6 address (in this case, ipv6.google.com) is 2001:4860:4002:0802:0000:0000:0000:1010. Rather than spell all that out, you can use :: to represent one contiguous block of zeros, and leading zeros can be removed. The formidable example address now becomes slightly less scary 2001:4860:4002:802::1010. Another example of an IPv6 address in this “compressed” notation, would be the IP address for Facebook 2620:0:1cfe:face:b00c::3 (faceb00c, lol). Yet another funny IPv6 address is cisco.com, at 2001:420:80:1:c:15:c0:d06:f00d (c15co, f00d).
Some differences in IPv4 and IPv6
The biggest difference in IPv6 from a network standpoint is that it virtually eliminates the requirement for Network Address Translation. Instead of proxying an IP address for multiple home networks/hosts, your IPv6 network is fully routable, meaning that you can access your home computer from the Internet without the need of using port forwarding or IP masquerading. While you technically can NAT an IPv6 address, it’s no longer an absolute requirement for Internet access. Because the Internet can now access your network, it is especially important that your firewall is configured to deny incoming connections from the Internet and explicitly allow connections on an as-needed basis (like running a web server from home, etc..). We will establish a common ruleset later on, once we have completed the IPv6 configuration.
Another significant change in IPv6 is changes made to the DHCP protocol. Instead of a DHCP server telling a host what the default gateway is for the attached network, the host will instead listen for a router advertisement and will use that in its internal routing table to know how to get to the public Internet. This router advertisement is handled by radvd which announces the router’s IP address to the network.
A few things to consider
When World IPv6 Test Day was enacted and executed last June, many major websites went online and started offering IPv4 and IPv6 dual stack websites for the purpose of testing the world’s readiness for IPv6. Many important things were discovered that day including the fact that most CPE devices (like Linksys routers, DSL and Cable modems and other devices) were not IPv6 compatible. This was later broadened to include many Internet-connected devices like DVRs, Media machines and other devices were also not ready for IPv6. While some sites maintain IPv6 connectivity, once World IPv6 Test Day closed, so did many sites on IPv6 connectivity.
Before you start out on bringing IPv6 into your network, it is important to understand that IPv6 is still regarded as being an experimental protocol. Most of the sites you are used to won’t work in a pure IPv6 environment so we are going to set up a dual-stack network. This means that you will be able to bring in IPv6 connectivity for IPv6 only sites and still be able to access your IPv4 sites just like your network has done in the past.
It is also important to realize that most embedded class devices will not use IPv6. Devices like embedded media players, game systems, WiFi access points, printers and the like may not support IPv6 even with firmware updates from the manufacturer. Some devices may get support later on through vendor updates however many devices will probably not work.
At the very least you will learn a lot about IPv6 deployment, and you will have plenty of time to test your equipment prior to IPv6 becoming mandatory.
Enough of the theory already, Let’s get started.
In order to bring IPv6 into your home, we will be using an IPb6 tunnel provided by Hurricane Electric’s TunnelBroker.net service. The service is free, and they provide you with a full /64 IPv6 network to play with. In addition, they provide a certification service to test your IPv6 knowledge and skills once your IPv6 connectivity is up and running. They give you a series of goals to accomplish even after your tunnel is up and you’re routing away and plus, it makes for great bragging rights.
In order to pull this off, you’ll need the following:
- PfSense 2.0 installed and working at the edge router on your network.
- A client computer for testing. ( Windows Xp, Windows Vista, Windows 7, Linux, etc..)
- Network switch, etc to make sure your client computer is connected to your router.
- A WAN Internet connection. (DHCP, Static, PPPoE, etc does not matter as long as it’s broadband)
Please Note: Due to the fact that we are using git to sync experimental code, you cannot use pfSense Embedded. I tried to find a way around this, but unfortunately even at the 4GB disk image size, I was never able to get it to fit and work.
The IPv6 configuration will be split up into six sections:
- Configuring your existing pfSense router to sync up the latest IPv6 code.
- Registering for an IPv6 Tunnel from Hurricane Electric.
- Configuring pfSense for the tunnel, and DHCPv6.
- Configuring workstations for IPv6.
- Performing website testing
1: Sync up the latest IPv6 code
We’ll start off with our already established and running pfSense router. We will need to enable SSH on the router so we can get to the commandline. This will be the only time you will need to access the commandline however I do recommend leaving it enabled so you can troubleshoot the IPv6 connection later on.
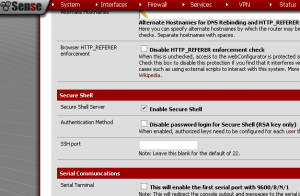
Start off by logging into the router. Click on “System”, then “Advanced”. Place a check box next to “Enable Secure Shell”. If you don’t want to use the standard port of “22”, you can specify a different port below. Scroll down to the bottom and hit “Save”. Don’t worry about opening up your SSH port, this does not enable it on the WAN interface.
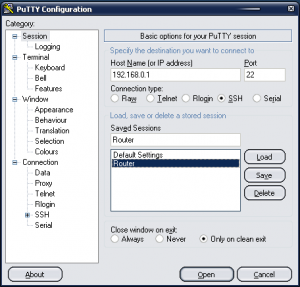
Open up PuTTY and type in the IP address of your router. If you specified an SSH port, be sure to specify it here as well. For reference, here is my PuTTY configuration.
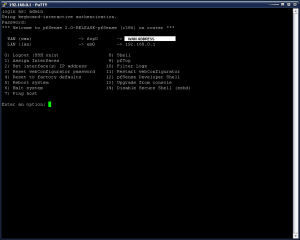
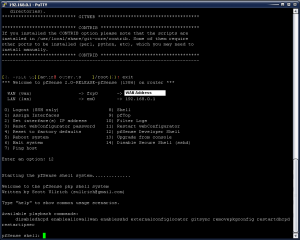
Upon successful connection, you will be prompted for a username. Use the same username and password you use for the Web UI (admin/pfsense). Once you have successfully logged in, you will get the same status screen like you see on the serial port showing the WAN and LAN statuses and a menu.
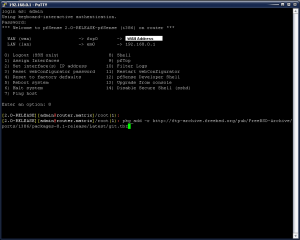
Select option 8 (Shell) and then type in the following command: pkg_add -r http://ftp-archive.freebsd.org/pub/FreeBSD-Archive/ports/i386/packages-8.1-release/Latest/git.tbz This will install GIT and perform the update. This will take several minutes to download and install all of the packages required to perform the sync.
Once it has completed, type in exit or hit Ctrl-D to return to the SSH menu. At the SSH menu, type option 12 for the “pfSense Developer Menu”.
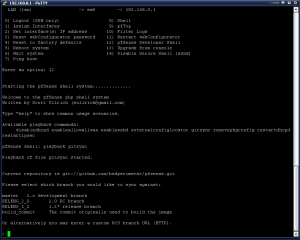
Now we will do the GIT sync. It is important to follow these instructions exactly as this is where the current running pfSense code is synched up with the pfSense developer code. At the pfSense developer shell prompt, type in playback gitsync and hit enter.
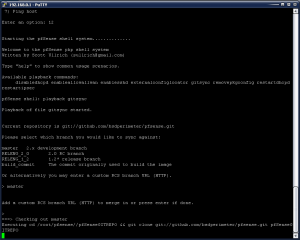
You will be prompted for the git branch to sync against. Type in master and hit enter. The next prompt will be for a custom RCS branch, just hit enter as we want to use the master branch only. After you hit enter, the GIT Sync will begin.
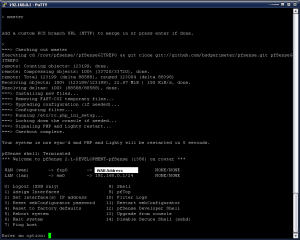
Ok, now here’s the kicker. You must reboot! In the screenshot below, it looks like the upgrade has terminated and the device has restarted services however there are settings that have been changed that will only take effect on the next reboot. The SSH Session should drop you back to the main SSH menu (what you saw when you initially logged in). From here, select option 5 and answer y to reboot the device.
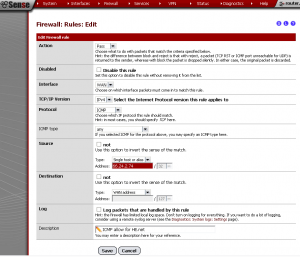
When the router has successfully rebooted, check that your Internet connection works and that all is working well. The one thing that remains is to set up an ICMP rule to allow Hurricane Electric to ping your WAN interface. This is required as part of the tunnel setup. Login to your router, click on “Firewall“, then “Rules“. Click the “+” add button at the bottom and add a new rule. Set the interface to WAN, protocol to ICMP, and ICMP Type to Any. (This can be modified later). For the source, set the type to “Single Host or Alias” and enter the IP address of 66.24.2.74. This is the IP address of the IPv6 test endpoint. Set the destination to “WAN Address” and lastly, enter a description. Refer to the screenshot below if you need help.
Now that everything is in place in your router, it’s time to get your tunnel.
2:Registering with Hurricane Electric
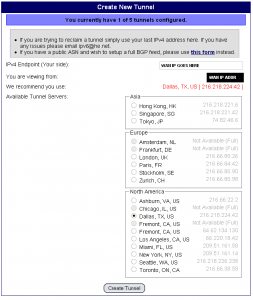
Now that our router is prepped for the IPv6 installation, it’s time to register the account with Hurricane Electric. Head on over to tunnelbroker.net and register an account. Once you’ve registered the account, you will get an email with the account information and a validation link. After you validate, click on the “Create Regular Tunnel” on the left hand sidebar and you will be provided a form similar to the one in the screenshot below. Be sure to select an endpoint that is as geographically close to you as possible or let the tool recommend the closest endpoint. (Note: Hurricane Electric allows you to create up to five tunnels. If this is your first tunnel, you will not see the “You currently have 1 of 5 tunnels” message.) Type your WAN IP address into the “IPv4 Endpoint” field, select the endpoint, then scroll down and hit “Create Tunnel”.
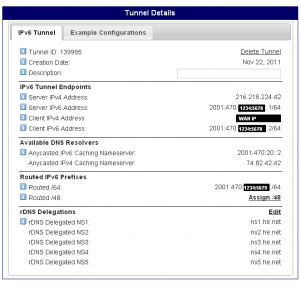
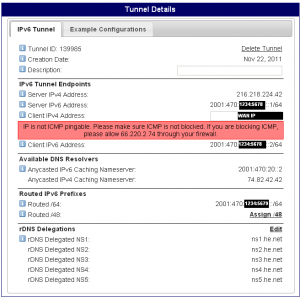
After your tunnel has been successfully created, you will get a page that shows your tunnel information. At the bottom of the page, you will notice that the rDNS delegation fields are blank. Click the “delegate to dns.he.net” link to autofill the reverse nameservers with Hurricane Electric’s default nameservers. Click “Save” to commit the changes, then print this page. You will need it for the pfSense page. Keep in mind that the tunnel IP address and the Routed /64 are off by one digit. This will be important later on.
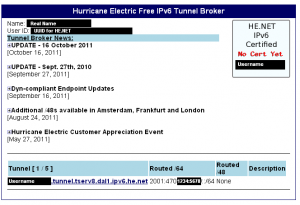
If you are on a dynamic IP connection (DSL, Cable Internet, FiOS, etc…), there’s one more thing you need to be aware of. Should your WAN IP change, you will need to update your tunnel. When you login to Hurricane Electric, you will get a page similar to the below, showing all of the configured tunnels on your account.
To edit the tunnel, click on the tunnel name and you’ll be taken to the Tunnel Information page. Click on the Client IPv4 address and make your IP change then simply click elsewhere on the page (not on a link) and wait for the text field to turn back to a link. If it does not, it will provide an error message indicating the error (usually that it can not ping the WAN).
3: Configuring pfSense
Building up our tunnel endpoint
Note: From here on out, I will be using the example IPs of 2001:470:1234:5678:: for the IPv6 tunnel and 2001:470:1234:5679:: for the Routed /64. In your tunnelbroker.net configuration, you should have a similar offset (your tunnel is one IP less than your routed netblock). Please keep this in mind as we go through the next steps as you can not get the two confused.
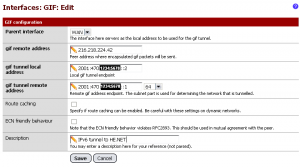
We have a synched router and we have our tunnel configuration. Now it’s time to start configuring pfSense. We will start out by building out the tunnel endpoint. Login to the router and click on Interfaces > Assign and click on the GIF tab. We will be adding a GIF tunnel in order to bring in the IPv6 connectivity to our router. GIF uses RFC2893 to encapsulate IPv6 into an IPv4 packet. When we receive an encapsulated packet, pfSense will “unpack” it and reassemble it into an IPv6 packet before acting on it according to the firewall policy. On the GIF tab, click the “+” link and enter your IPv6 tunnel endpoint information.
- Parent Interface should be set to WAN
- GIF Remote Address should be the “Server IPv4 address”
- GIF Tunnel Local Address should be the “Client IPv6 address”
- GIF Tunnel Remote Address should be the “Server IPv6 address”
- Description should be something descriptive but can be freeform.
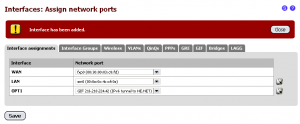
Once complete, hit “Save”. This will add the tunnel endpoint to the router. Click on Interface Assignments so we can assign it to a virtual interface. To do this, click on the “+” icon and the GIF tunnel should show up as an OPT interface as shown in the screenshot below.
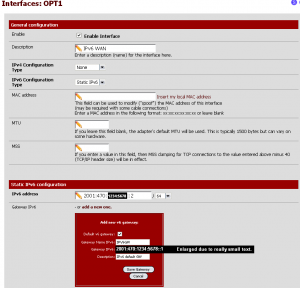
Now we need to configure the OPT interface. Click on Interfaces > OPT1. This will be the equivalent to the “WAN” of our IPv6 network. Since it has never been used before, it is disabled by default. Place a checkbox next to “Enable Interface” which will add the IPv6 configuration section shown here. Set the
Click on the text “Add a new one” in the Gateway section and enter the configuration as shown.
- Default v6 Gateway should be Checked.
- Gateway Name IPV6 is a brief one-word name to help you identify the gateway. I have chosen “IPV6GW”.
- Gateway IPv6 should be the Server IPv6 Address.
- Description is an arbitrary length text to describe this gateway definition.
When you’re done, you should have something similar to what is in the below screenshot. For some reason, the gateway text showed up very small, so I increased the zoom so it was readable.
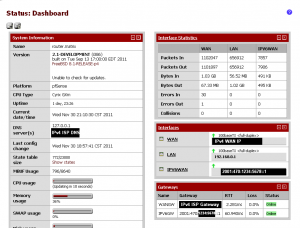
Click on “Save Gateway” first to commit the gateway information. You should see te IPv6 gateway show up in a dropdown. Next, scroll down and click “Save” to save the Interface information. Finally, click “Apply Changes” to apply the interface configuration and start the tunnel. You can validate the tunnel’s operation by checking the dashboard (click on the pfSense logo). If you don’t have the Interfaces and the Gateways windows, they can be added by clicking on the “+” and selecting the relevant options.
Now that the endpoint is up and running, it’s time to configure the LAN interface.
Setting up the LAN interface
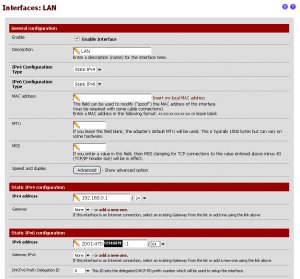
Since we’re running in a dual-stack configuration, we are going to just add the IPv6 information to the existing IPv4 interface. As an option, you could theoretically set up a VLAN and a new LAN interface and create an IPv6 only network. This is something I’m planning on my network and something I’m sure I’ll cover in another article. Let’s start off by pulling up the LAN configuration via Interfaces > LAN.
First thing to do is set the IPv6 Configuration Type to Static IPv6. This will show the IPv6 configuration section. Enter the first IP address in the Routed /64 section from the tunnel information. When complete, you should have something like the screenshot below. Scroll down and hit Save to write the settings, then Apply to make the new settings active.
Setting up DHCPv6
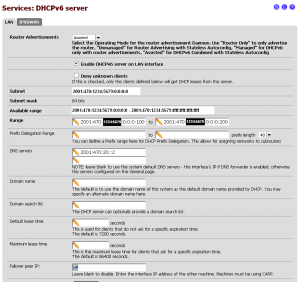
In order to bring the IPv6 configuration to your workstations, we will set up DHCPv6. This is entirely optional as right now you could go ahead and set up static IPv6 addresses just as well as using DHCP however rather than typing insanely larger addresses into all of your workstations, it’s easier and faster to set up DHCPv6 and let the client OSes pull the DHCPv6 as needed. To get started, click on Services > DHCPv6 Server and then on the LAN tab.
- Set the Router Advertisements to Assisted. This controls the radvd daemon mentioned earlier. By setting the mode to “Assisted”, you are telling radvd to perform router advertisements on the local network. The radvd broadcasts are used by the DHCP client applications to set the default router.
- Place a check next to Enable the DHCPv6 server on the LAN interface.
- Enter the desired start and end addresses for your network DHCP range. Please note that unlike the “short notation” using the double colon, you must explicitly declare the zeroes for all octets. In my example, I’m using 2001:470:1234:5679:0:0:0:100 as my start point and 2001:470:1234:5679:0:0:0:200 as my end point, allocating 256 addresses to DHCP (remember, IPv6 addresses are hexidecimal.)
- Enter the Anycasted IPv6 DNS server from the Hurricane Electric tunnel configuration into the DNS server field.
Configure some Firewall rules
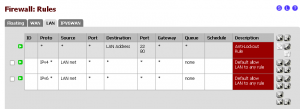
At this point, we have the router configured however without some firewall rules in place, we will not be able to route out or get a DHCP address. We will need to add a rule so that our IPv6 traffic can get out. Click on Firewall -> Rules then click on the LAN tab. We are going to duplicate the outbound rule created for the LAN outbound. In the rule listing, click on the “+” icon to the right of the IPv4 outbound rule and change the protocol from IPv4 to IPv6. Once done, hit Save then Apply. When you’re done, your LAN rules should look like the below.
4: Configure your workstations
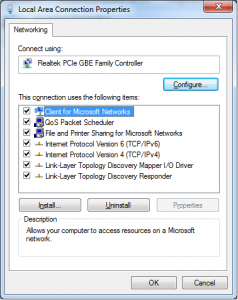
After you get the router configured, it’s time to set up a workstation. For this test, I used a Linux box and a Windows 7 workstation. For Windows, all that is needed is to make sure that the NIC has IPv6 support bound to it. To do this, go to the Network and Sharing Center and click on the “Adapter Settings” on the left hand sidebar. Right click the adapter and go to Properties. Make sure that IPv6 is listed and checked as shown below:
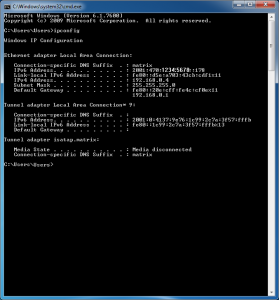
To test that it’s working properly, open up a command prompt and check to see that ipconfig is showing the proper IP address. Disregard any fe80:: addresses as these are link-local and not routable for our purposes. Your output should look something similar to my output below:
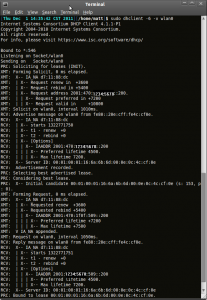
In Linux, the setup is even easier. Most Linux operating systems already have IPv6 enabled, so it’s just a matter of pulling an IP address. Run sudo dhclient -6 -v {interface} where {interface} is your network interface. In my output below, I am using wlan0. The -v parameter is optional, this is only to show what dhclient is doing and that it picked up the address from pfSense.
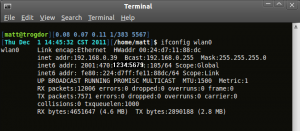
This next screenshot shows ifconfig with three IP addresses: One IPv4 address, one link local IPv6 address and the routeable IPv6 address.
If you want to make the IPv6 settings permanent, you can set this information in Network Manager. Edit your existing network connection, click on IPv6 Network, set the “Method” dropdown to Automatic and hit Save. I didn’t provide screenshots on this because it depends on the network type and connection name and it ended up being way more complex than necessary. IPv6 connectivity should work on both wired and wireless Ethernet adapters.
5: Time to test!
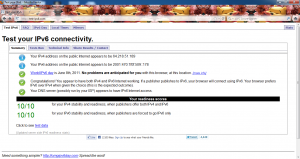
There are several sites that are available that allow IPv6 testing and IPv6/v4 dual-stack testing. My favorite is http://test-ipv6.net. The site does IPv6 and IPv4 dual stack testing and ensures that you are able to connect to IPv6 and IPv4 sites. There is also test surfing to http://ipv6.google.com which is an IPv6 only site. If all goes well, you should receive output like the below:
So, what now?
With IPv6 properly working on your network, you are good to go however there’s probably not much to look at. Most of the sites I tested were IPv4 only and the few IPv6 sites I could find were mostly broken. From a consumer-side standpoint, you will notice no difference in the operation of websites. From a server standpoint, each IP address is routeable meaning that each and every IP in your netblock can run web-accessible services. The thing now is to pay close attention to your firewall.
Remember that all IPs are routeable! Prior to this setup, your router implicitly “protected” your LAN by using network address translation. By default, the router would allow LAN connections to exit the router but any unsolicited connection from the Internet could not access the LAN workstations due to how NAT works. We used port forwarding to allow outside Internet computers inside to access local services. IPv6 has no such requirement and all IPv6 addresses are public. You need to make sure that your router’s firewall is set up properly and only allows incoming connections to IPs as needed by your network. Our firewall configuration is set up with a default deny policy with an explicit LAN outbound rule. This means that inside IPv6 addresses can surf the Internet uninhibited but any unsolicited connection from the Internet is automatically blocked.
Test your network devices! Test all of your devices, from your computers to your smartphones, printers and anything else that plugs into the network. You’ll get a quick idea of what works on IPv6 and what doesn’t. You’ll also have a good idea of which manufacturers and what devices to look for firmware updates in order to get ready for when IPv6 goes live.
For further things to do with your tunnel, take a look at Hurricane Electric’s IPv6 certification test. The IPv6 certification test will test your knowledge of IPv6 and setting up various services on an IPv6 server including email and a Web server. It’s a good idea to give it a shot so you can get experience working with the new IPv6 network.
Hopefully all went well in your IPv6 configuration and you’re up and running. If not, post a reply and I’ll try my best to help out.
Happy Hacking!
FIRESTORM_v1
6 Comments for this entry
1 Trackback or Pingback for this entry
-
I got IPv6 working! :D (3 hours Later) NOOOOOOOOOOOOOO!!! – Victoria's Blog
November 18th, 2019 on 4:51 pm[…] wish I’d read the first paragraph “Some differences in IPv4 and IPv6” from Your Warranty Is Void.com before attempting to setup IPv6 this […]
December 4th, 2011 on 11:42 am
Nice write up.
JimP has built some NanoBSD images from the 2.1 development code you can use for testing:
http://files.pfsense.org/jimp/ipv6/
Steve
December 6th, 2011 on 4:19 am
Hello Steve:
That’s awesome news! I felt kind of bad publishing the article earlier on using pfSense Embedded then I released this one not long after with “Doesn’t work on Embedded”… I’ll give those images a shot and if it all works, I’ll definitely update the article.
Thanks for the tip!
FIRESTORM_v1
September 23rd, 2014 on 1:18 am
You state “I’m using 2001:470:1234:5679:0:0:0:100 as my start point and 2001:470:1234:5679:0:0:0:200 as my end point, allocating 256 addresses to DHCP (remember, IPv6 addresses are hexidecimal.)” although this is a range of 512 addresses. :0100 > :0200 = 0000000100000000 (2^9th = 512)> 0000001000000000 (2^10th = 1024) = 1024-512=512
September 23rd, 2014 on 2:28 am
My apologies, :0100 > :0200 = 0000000100000000 (2^8th = 256)> 0000001000000000 (2^9th = 512) = 512-256 = 256, cant use :1 > :80 due to Anycast I believe (first 128). IP4 was a piece of cake, IPv6 has and will be a difficult journey for me!
November 9th, 2015 on 10:22 am
Hello dude,
I tested with the site http://test-ipv6.net and Linux 100% ok, but in windows I get an error regarding the ICMPv6 type 2 (packet to big) packets.
This happened to you?
November 9th, 2016 on 11:19 pm
It is 2016 and this article is still relevant! Great write-up!